Description
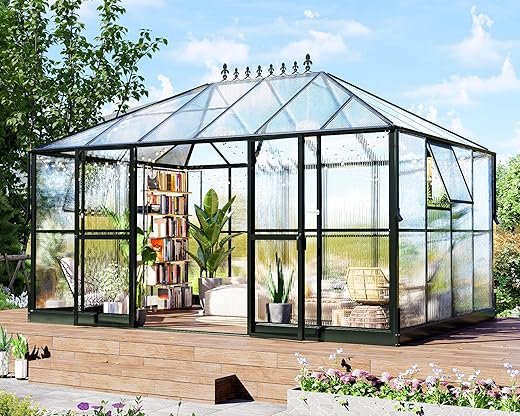
HOWE 14×9.5×9 FT Polycarbonate Greenhouse
Product Overview
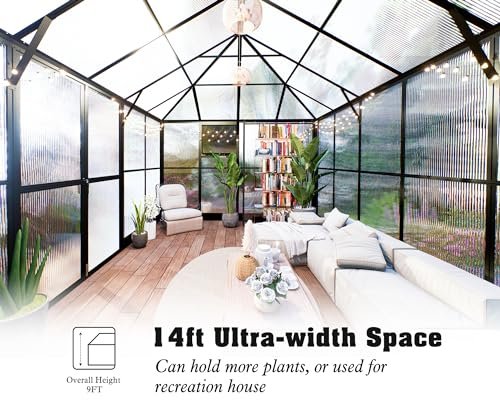
The HOWE Polycarbonate Greenhouse is a spacious 14×9.5×9 FT structure designed for hobby gardening and recreational use. It features a walk-in design with an upgraded 6 FT wall height, allowing for easy access without bending over.
Key Features
-
Ample Space: The greenhouse offers a generous height of 9 FT and a wall height of 6 FT for accommodating more plants and activities.
-
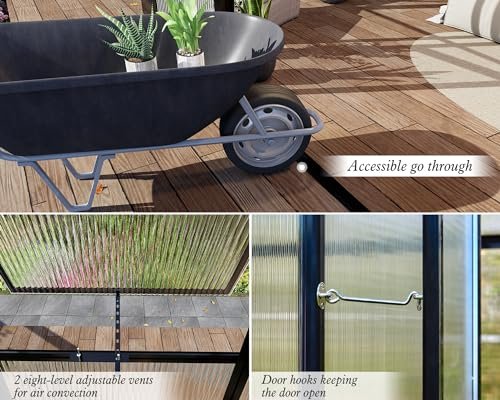
Ventilation: Equipped with 2 wide swing doors and 2 adjustable side vents for optimal air circulation and moisture management.
-
Durable Construction: Made from heavy-duty 6mm twin-wall translucent PC panels with 99.99% UV protection and a rust-resistant aluminum frame, ensuring stability and longevity.
-
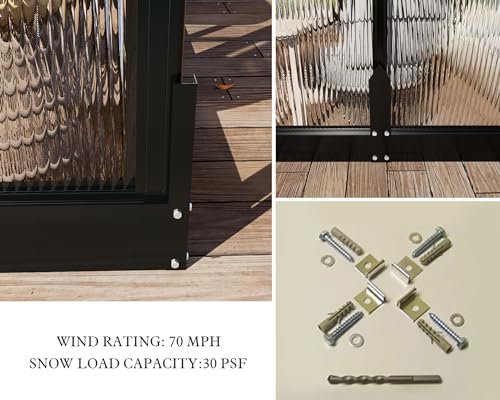
Wind and Snow Resistance: Reinforced with 4 corner posts and 2 middle posts, it has a wind rating of 70 mph and a snow load capacity of 30 psf for added safety.
-
Unique Design: Features drainage holes, attached pipes for water management, and a Victorian roof crest to deter birds. The greenhouse can be assembled by 3 DIY enthusiasts in about 12 hours.
Conclusion
This large winter greenhouse is perfect for outdoor gardening, providing a robust and spacious environment for your plants while ensuring ease of access and excellent ventilation.





rod sommer –
There is absolutely nothing bad about the product. The boxes came with everything included. Quality and precision are amazing! What really impressed me was that most of the metal parts was wrapped in individual plastic. On top of that each part had its own plastic tape protecting it (you need to pull it off before using it).
Now for the only negatives: Anything larger than a 12×12 foot requires special permits (e.g. for North Carolina). When I asked the company’s help line about the documentation needed for the permit (e.g. health, structural etc.) they had no clue what I was referring too or wanted to help). Also, the windows are on the side, (not in the roof) so cooling it in the summer may be a concern. Lastly, the plastic siding is open on the top and bottom and unless you seal it will silicon it will have condensation in it over time (likely going green over time). Seems to be the case with most of these cheaper greenhouses that are online.
My suggestion is having 2 people install it. I did it by myself and putting the roof up alone was a tad difficult. I would also look into automatic window openers, the product they recommend in the manual is just impossible to find online.
Overall, fantastic product and I highly recommend it for the price.
Don –
The green house looks nice. Some of the directions are not clear on what to do but with a little looking not hard to figure out. Some of the pieces came bent and dented.
HEINRICH P TRAUTMAN –
There are three boxes total. Received one box and then the other two box’s three days later. Parts are wrapped very well. They even give you a bag of extra parts. Learned a few lessons at first. Most important is to not skip the mounting the base and frame. These help keep the entire thing from falling apart as you build. Directions are not great. You’re left to figure some parts out on your own. I read through the entire directions before I started. Helps to sort all the pieces into stacks first. Before you put the polycarbonate panels in, make sure you put the extra bolt in for the support. I went through and caulked around the each panel after I was done. I’m not impressed with the windows, so I’ll figure out a better way to secure them when they’re closed for the winter.
Leslie H. –
First let me say that I am disappointed to not attach pictures of my beautiful greenhouse, but AMAZON requires that you give them the ability to access ALL of your photos and that is a big HECK NO for me.
So, it was an adventure. We live in south Texas so between the extreme heat, humidity and tropical storms it took several weeks to complete. I can tell you the more slowly we took it, the instructions became much easier to understand. No problem with the instructions. My husband and I built this greenhouse. Neither of us are in the building industry.
FIRST::::: I laid one of the large packaging cardboard pieces on the grass and separated, inventoried all of the metal parts. I laid the parts out by numbers leaving a foot of cardboard at the bottom to label and quantity of each part (example: 102a (6), 102b (4), up to 128 a, b, etc). This made it extremely easy to find the part and confirm all was there. There are a LOT of pieces. It looks overwhelming at fist, but when breaking it down into manageable steps it is sooo much easier. There is a small white label on each part. On the small bags, the white label is there, but the numbers are inside, just look, it’s there. I put the bolts/screws into disposable containers and labeled the lid with a marker.
SECOND::: Measure, remeasure and use a leveler to make sure the base is square, and level BEFORE you begin, this is very, very important.
THIRD::: Try to get as many of the sides put up as possible on day 1. I read the instructions and laid out the parts on each side at every step to make it smoother for my husband.
FORTH:::: I built the roof inside our garage and we carried it out (just him and I), lifted it up and placed it on the frame, as close as possible, to be able to connect and secure. This worked out sooo well. I couldn’t imagine trying to build it on site.
FIFTH::: Only remove the protective covers on the poly carbonate sheets just before you slide them in place, as the white side goes out. Sliding is much easier. We found that some of the vertical side metal pieces had to be readjusted to make it stay square and be able for the poly carbonate panel to slide in and fit.
SIXTH:::: You will end up drilling some holes into the metal pieces, some are not pre drilled and a few just does not line up. No worries.
SEVENTH:::: You have already built the windows and doors ( I did by myself), so that is the final step. Having made sure it’s level and square will make this a breeze.
Attach the down spouts (which it rained yesterday, I used a 5 gal pail at two of the sides and got at least 4 inches of water in each one!!)
Given how we made the base, 4×6 treated wood it appeared we needed a different part to secure (D308), but in the end we made it work with what we had. D308 does not come with the unit, it is an alternative part to secure the base.
One door attachment, the lock/hook was broke off. I though I could just replace it, but the part is not screwed onto the metal (riveted), so a new part would have to be sent. The seller offered fair compensation for us to fix it ourselves, which we agreed to.
Amazingly we were not short ANY part. Of all of the pieces to put this together, they we ALL there !!!! The greenhouse is strong when completed. So, just looking at a few parts and thinking this is going to be a flimsy set up, don’t judge until it’s done. It is so satisfying to look at and begin to organize.
The seller was easy to contact and they responded within 24 hrs. Overall I am just as happy as can be.
Enjoy your journey !
R. Havens –
The media could not be loaded.
This took a couple afternoons for my husband and I to put together. If you follow the instructions in order you need multiple people. I do think for someone handy, one person could put this together, but it would not be easy. So far it is working as advertised. We are very happy with our purchase.
Oconomowoc63 –
Directions not perfect but figured it out and end product is really nice
R. Havens –
This company it one of the best I have worked with in a long time. They care about their customers and that is rare these days. Keep up the great work. When I get the Greenhouse Up will post of how great it.
HEINRICH P TRAUTMAN –
Great instructions
Great value
Went up in 8 hours (wife & me)
We did build a box for it to sit on and filled the box with pine mulch..which was as much work.
Would buy again